Cursed Isles
Cursed Isles Expedition requires a special chart. The aim is to cross a sea with fog, whirlpools and winds to get to an island where you battle the Cursed Islanders and then forage to get chests, then to leave the island and take the treasure back across the sea and then home to port. Unique CI trinkets, clothes and special furniture, statues, gators and a familiar (snake) can be won.
Usually the CI is done on a sloop with 7 people, occasionally on bigger boats. To get the best outcome from a CI you need a crew who excel in their station (generally renowned plus), can token successfully and quickly, and have abilities in rumble, swordfight and speed foraging.
There are 2 types of CI - thralling and non-thralling. Non-thralling CIs head straight for the island and try to pick up 1 or 2 thralls en route. Thralling CIs aim to get a certain number of thralls first, generally this is 7.
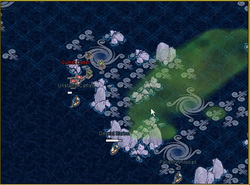
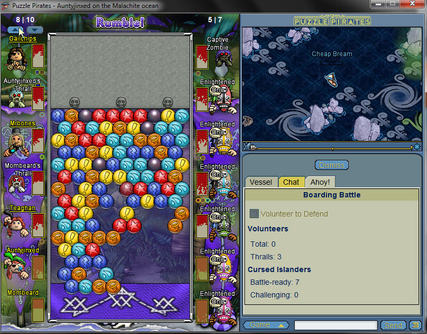
Outline: On entering the CI the bnav will try to find a good position where the sloop is somewhat protected from rafts, sloops and cutters. The area between the 2 entry areas is called the safe zone, as only rafts and not Cultist Cutters nor Sinister sloops will come in this area. Rafts will spawn from an island surrounded by wind and will head towards your sloop. The rafts will disintegrate if they are in a space adjacent to your sloop and the boarders will climb onto your sloop. Initially they will challenge a member of the crew, and this challenge should be dismissed and not fought. After a turn, they will go from challenging to battle ready. The reason we do not fight these boarders is that they can be useful to us. There are two types of boarder: Enlightened Ones and various types of zombies. The zombies can be converted to our side using a gold flower token (which is made up of 2 sail/rig, 2 carp, 2 bilge flower tokens) and then they will fight alongside us in frays both on the sloop and at the island. Every pirate on board can have a thrall, so on a sloop you can end up with 7 pirates and 7 thralls which equals 14 fighters. If you have a bot on board (due to a pirate leaving) it will fight with you but does not get its own thrall and does not forage. There is a risk of getting too many boarders - which is 7 in a sloop - and this will cause a rumble fray to be held which must be won by the pirates otherwise the boarders will take over the sloop and you effectively end up sinking.
Once the desired number of thralls has been reached, the bnav will head to the island which needs plenty of moves from sails. Fog can cause damage to the ship causing bilge to rise and moves to slow, so constant repair is required. Cultist Cutters and Sinister Sloops may chase the sloop and try to shoot the sloop.
Once the island is entered, the first fray is a rumble, which is followed by a speed forage that is time limited. Do not go for combos, but click quickly to clear as many chests as possible. If you get stuck, and there is no obvious clearance in 2 moves, then dismiss and restart the forage - there is no penalty other than a little loss of time. The bnav will decide whether to run or stay, and the next fray is a swordfight followed by speed forage, then a rumble followed by speed forage, then swordfight and so on. If you lose a fray or if the bnav decides to run you will be transported back to the sloop where you need to take stations quickly for a quick run out of the CI. You must exit the map and decide whether to port or re-enter. At port the booty is divided and you will see what everyone received.
Usually the CI is done on a sloop with 7 people, occasionally on bigger boats. To get the best outcome from a CI you need a crew who excel in their station (generally renowned plus), can token successfully and quickly, and have abilities in rumble, swordfight and speed foraging.
There are 2 types of CI - thralling and non-thralling. Non-thralling CIs head straight for the island and try to pick up 1 or 2 thralls en route. Thralling CIs aim to get a certain number of thralls first, generally this is 7.
Outline: On entering the CI the bnav will try to find a good position where the sloop is somewhat protected from rafts, sloops and cutters. The area between the 2 entry areas is called the safe zone, as only rafts and not Cultist Cutters nor Sinister sloops will come in this area. Rafts will spawn from an island surrounded by wind and will head towards your sloop. The rafts will disintegrate if they are in a space adjacent to your sloop and the boarders will climb onto your sloop. Initially they will challenge a member of the crew, and this challenge should be dismissed and not fought. After a turn, they will go from challenging to battle ready. The reason we do not fight these boarders is that they can be useful to us. There are two types of boarder: Enlightened Ones and various types of zombies. The zombies can be converted to our side using a gold flower token (which is made up of 2 sail/rig, 2 carp, 2 bilge flower tokens) and then they will fight alongside us in frays both on the sloop and at the island. Every pirate on board can have a thrall, so on a sloop you can end up with 7 pirates and 7 thralls which equals 14 fighters. If you have a bot on board (due to a pirate leaving) it will fight with you but does not get its own thrall and does not forage. There is a risk of getting too many boarders - which is 7 in a sloop - and this will cause a rumble fray to be held which must be won by the pirates otherwise the boarders will take over the sloop and you effectively end up sinking.
Once the desired number of thralls has been reached, the bnav will head to the island which needs plenty of moves from sails. Fog can cause damage to the ship causing bilge to rise and moves to slow, so constant repair is required. Cultist Cutters and Sinister Sloops may chase the sloop and try to shoot the sloop.
Once the island is entered, the first fray is a rumble, which is followed by a speed forage that is time limited. Do not go for combos, but click quickly to clear as many chests as possible. If you get stuck, and there is no obvious clearance in 2 moves, then dismiss and restart the forage - there is no penalty other than a little loss of time. The bnav will decide whether to run or stay, and the next fray is a swordfight followed by speed forage, then a rumble followed by speed forage, then swordfight and so on. If you lose a fray or if the bnav decides to run you will be transported back to the sloop where you need to take stations quickly for a quick run out of the CI. You must exit the map and decide whether to port or re-enter. At port the booty is divided and you will see what everyone received.
How to thrall in CIs
A few basic rules
1 You need Boarders
2 You need a gold flower token
3 You need to have Zombies on board
4 Enlightened Ones cannot be made in to thralls
5 You must check how many Enlightened Ones and Zombies you have by leaving the nav wheel and looking at the stations
6 The boarders must be battle ready
The first boarder is always an Enlightened One, however there can be up to 3 Enlightened Ones (or if really unlucky up to 6!) Once you have a Zombie you will have no more Enlightened Ones until you completely clear the ship and get more boarders. The most number of thralls you can get with one gold token is 2 (for a sloop), so to have the best chance of getting this you need 2 Zombies + however many Enlightened Ones you have on board. So for 1 EO you need 2 zombies, which is 3 boarders, for 2 EOs you need 2 zombies which is 4 boarders and so on. When they board the ship the EOs and zombies will challenge an individual pirate. Once they are dismissed, they will become battle ready in the next turn. Use your gold token when you have the right number of zombies battle ready. In the case of a fray, a gold token will still convert 1 to 2 zombies to thralls even if there is only 1 zombie left (however this is unlikely if an EO is the remaining fighter). Silver tokens are useful in managing the number of boarders especially if getting close to fraying, and also for clearing boarders when getting close to the island with all your thralls, however they generally only get rid of 1 boarder at a time.
Video discussing thralling:
Other bnav tips
When you enter look at both sides and decide which is preferable to go down on and come back on
Use the very edges of the sides as this reduces the amount of contact sloops and cutters have with you
All the walls of the board are soft - this means you can move out of the board without any damage, useful for getting around rocks at the sides
Try and work out your first moves out of the island before going into the island
Thrall in the safety zone - either find a good spot to gun rafts from, or keep on the run from rafts
Rafts sometimes end up ramming against you - in this case, the raft dies with no boarders coming aboard
Green whirlpools contain fog which do damage over time - try not to get stuck in these
Green whirlpools move counter-clockwise
If you have winds going the wrong way on the edges, use lefts and rights to move over them - if you have 4 winds and not enough moves, put what you have as the third and/or last moves in a turn, and then as the first and second (and third) moves in the next turn - this way you won't be blown back again
Try to minimise time in fog, not only does it cause damage, it also affects pirates puzzling - those messages where the crew see visions etc indicate they are being affected
Don't waste your shots on cursed sloops and cutters when you are in a sloop - you are unlikely to sink them
You cannot be killed by bumping on rocks even if you have full damage - you can be killed by either a shot from a sloop or cutter, a collision with a sloop or cutter, or a ram from a raft
If you are near max damage and a sloop or cutter is on your tail, going outside the board and bumping on rocks can buy you time to get 2 moves together and possibly allow the sloop or cutter to move away from you; but remember the point above when you do move as you will have max damage
Remember that if bilge is more than 1/8th full, then your moves made by sails will be reduced to 1 per 2 turns - get the bilge down first before adding sailors, Also remember to keep carping
If you find your carp and/or bilge going up despite no damage and no fog, it is likely that there are a number of boarders on the station. Try to avoid getting more boarders than you need, but if you do and are struggling with bilge and tokens from bilge, consider getting overrun and having a fray to clear the ship and get back control. Alternately using gold tokens to thrall the zombies will also help reduce numbers.
If you get an overrun fray, consider sending off a puzzler needed to complete the gold token. If a gold token is made during the fray you can use it even if you only have one EO left, providing the timer will finish and the token be used before the last cultist dies. You may still get 2 thralls
If you get an overrun fray when near a sloop or cutter than send a sailor off to make moves for you so you can outmanoeuvre the sloop/cutter. Be careful not to send too many out of the fray, and try and be mindful of when break is
Don't forget to protect thralls in overrun frays - they have half damage to start with so need protection quickly if they are under attack
If when overrun and fraying you look like you might lose, try to exit the board to save your ship. If you do lose the fray, the ship is overrun, you get kicked off (like a sink) but the ship is now an enemy ship on that ci board, and it can go in the safety zone and shoot at pirates.
On the island:
Protect thralls that are under attack
Fight EOs first in rumbles
Try to team with thralls in swordfight
Fight Homus last - they tend not to attack until they are attacked, and they can also provide useful blocks of colour for large breaks
Fight Vargas first - Vargas fights hard, and can easily take down pirates, get rid of him with 3 on him
For 7 pirates:
1st fray is against 7 + any boarders on ship (up to 14 total)
2nd fray is against 8
3rd fray is against 9
4th fray is against 11
5th fray is against 12 (Vargy 1)
6th fray is against 14
7th fray is against 15 (Vargy 2)
8th fray is against 16 (last fray)
If you lose a pirate then the numbers of enemy will decrease by 1
If you have a bot, it may be worth firing it before a new fray starts - especially the 4th fray
In forage, make sure people know they can dismiss and re-enter and it's about speed not combos
After forage you have just enough time to look at the booty count and still be able to press retreat if you wish
- Frenetic — 15 points and up
- Swift — 12 to 14 points
- Brisk — 9 to 11 points
- Steady — 6 to 8 points
- Lethargic — 3 to 5 points
- Asleep — 0 to 2 points
